Amazon Managed Grafana SAML integration
December 19, 2024 AWS Grafana Entra ID SAML
Amazon Managed Grafana is a powerful tool for monitoring and visualisation, and integrating it with an identity provider (IdP) such as Microsoft Entra ID using SAML provides a secure and streamlined access management. Deploying Amazon Managed Grafana and configuring SAML integration are pretty straightforward.
Recently, I needed to configure group-based access control using the SAML group attribute and Grafana team sync, but I faced some challenges getting it to work. Both the AWS and Microsoft documentations do not clearly elaborate the steps to successfully enable the group attribute sync to Grafana team.
I have captured the process in this post, including the steps to deploy Amazon Managed Grafana and create a basic Grafana dashboard for quick demo.
Overview
Amazon Managed Grafana (AMG) is a fully managed, scalable, and highly available service that extends the capabilities of open-source Grafana, enabling interactive visualisation of monitoring and operational data. It allows users to analyse metrics, logs, and traces collected from diverse sources across their IT ecosystem, including AWS services, third-party integrations, and other cloud or on-premises resources.
AMG also integrates with AWS IAM Identity Center and supports SAML 2.0, enabling fine-grained access control by assigning users in your corporate directory specific permissions for dashboards and data sources.
AWS offers a 90-day free trial for AMG, with up to five (5) free users per account. So if you are deploying AMG for the first time in your AWS account and stay within the 5 users limit, you would not be charged for 90 days. Learn more about the Amazon Managed Grafana pricing.
Requirements
If you want to follow this guide, you will need the following setup:
- An AWS account
- An Azure account with Microsoft Entra ID P1/P2 plan subscription
- EC2 workload running in the AWS account to generate CloudWatch metrics
- Entra group populated with some Entra users.
Microsoft Entra ID P1 or P2 plan subscription is required to enable Entra groups assignment to Enterprise applications. Microsoft offers a 30-day free trial Entra ID P2 plan subscription for first-timer so you can utilise this without incurring any Azure charges. 👍
Your AWS account may incur some charges for running the EC2 instance if your account does not have free tier. You also need to be wary not to exceed the AMG 5 free users limit. Otherwise, you will be charged for the additional Grafana users.
Step 1: Deploying AWS Managed Grafana using Terraform
Let’s deploy and set up Amazon Managed Grafana using Terraform. The code is available in my GitHub repository and I will explain what the Terraform code snippet creates here.
Create a Grafana workspace
This Terraform code creates a Grafana workspace in the current AWS account, set the Grafana workspace to use SAML authentication, and configure an IAM role for the AWS Grafana service.
resource "aws_grafana_workspace" "demo" {
  name                     = "grafana-demo"
  account_access_type      = "CURRENT_ACCOUNT"
  authentication_providers = ["SAML"]
  permission_type          = "SERVICE_MANAGED"
  role_arn                 = aws_iam_role.grafana.arn

  data_sources = ["CLOUDWATCH"]
}
Configure Grafana workspace SAML and assertion attributes mapping
This code will enable SAML and configure the assertion attributes to map your IdP group information into Grafana.
resource "aws_grafana_workspace_saml_configuration" "demo" {

  admin_role_values       = ["Grafana_Admins"]
  editor_role_values      = ["Grafana_Editors"]
  role_assertion          = "groups"
  groups_assertion        = "groups"
  # Replace this dummy IdP metadata url for SAML to work
  idp_metadata_url        = "https://replace.link.with.your.idp.metadata.url/"
  workspace_id            = aws_grafana_workspace.demo.id
}
The role_assertion defines the assertion attribute role to the IdP attribute name groups where the role information (Admin and Editor) will be extracted from. The groups_assertion defines the assertion attribute group groups that will be used to map to Grafana teams for team sync.
The admin_role_values defines the IdP group Grafana_Admins that should be granted Grafana Administrator role permissions whereas the editor_role_values defines the IdP group Grafana_Editors that should be granted Grafana Editor role permissions. All other user role values will be granted Grafana Viewer role permissions by default.
Note that in my Terraform code, I used a dummy idp_metadata_url to get through the SAML configuration. The SAML logins will not work because of the dummy host DNS. If you tried to login to Grafana using SAML at this point, you will get an error that the host DNS is not resolvable. The URL needs to be replaced with the actual IdP metadata file URL manually after the Entra ID SAML configuration steps are completed (Step 3).
Create an IAM assume role for Grafana
An IAM role will be created for the Grafana workspace to assume to read EC2 and tags, and metrics from the data source CloudWatch.
resource "aws_iam_role" "grafana" {
  name = "grafana_assume_role"
  assume_role_policy = jsonencode({
    Version = "2012-10-17"
    Statement = [
      {
        Action = "sts:AssumeRole"
        Effect = "Allow"
        Sid    = ""
        Principal = {
          Service = "grafana.amazonaws.com"
        }
      },
    ]
  })
}

resource "aws_iam_role_policy" "grafana_assume_policy" {
  name = "grafana_assume_policy"
  role = aws_iam_role.grafana.id

  policy = data.aws_iam_policy_document.grafana_assume_policy.json

}

data "aws_iam_policy_document" "grafana_assume_policy" {
  statement {
    sid = "AllowReadingMetricsFromCloudWatch"
    actions = [
      "cloudwatch:DescribeAlarmsForMetric",
      "cloudwatch:DescribeAlarmHistory",
      "cloudwatch:DescribeAlarms",
      "cloudwatch:ListMetrics",
      "cloudwatch:GetMetricStatistics",
      "cloudwatch:GetMetricData"
    ]

    resources = [
      "*"
    ]
  }
  statement {
    sid = "AllowReadingTagsInstancesRegionsFromEC2"
    actions = [
      "ec2:DescribeTags",
      "ec2:DescribeInstances",
      "ec2:DescribeRegions"
    ]

    resources = [
      "*"
    ]
  }
  statement {
    sid = "AllowReadingResourcesForTags"
    actions = [
      "tag:GetResources"
    ]

    resources = [
      "*"
    ]
  }
}
Generate AWS Grafana workspace service account and token
A service account with Admin role will be created to run automated workloads in Grafana to configure Grafana and create dashboards.
resource "aws_grafana_workspace_service_account" "demo_admin" {
  name         = "demo-admin"
  grafana_role = "ADMIN"
  workspace_id = aws_grafana_workspace.demo.id
}

resource "aws_grafana_workspace_service_account_token" "demo_admin" {
  name               = "demo-admin-key"
  service_account_id = aws_grafana_workspace_service_account.demo_admin.service_account_id
  seconds_to_live    = 3600
  workspace_id       = aws_grafana_workspace.demo.id
}
The service account token will be assumed by another Terraform stack to create a dashboard and configure Grafana team sync later in Step 4.
Apply the Terraform configuration
This step assumes you have already configured the AWS account credentials.
Initialise and apply the configuration:
git clone https://github.com/wtkhoo/aws-grafana-saml.git
cd aws-grafana-saml
terraform init
terraform apply -auto-approve
This will create the Grafana workspace in your AWS account.
Step 2: Configuring SAML integration in Entra ID
This step is manual through ClickOps to set up Microsoft Entra ID as the identity provider.
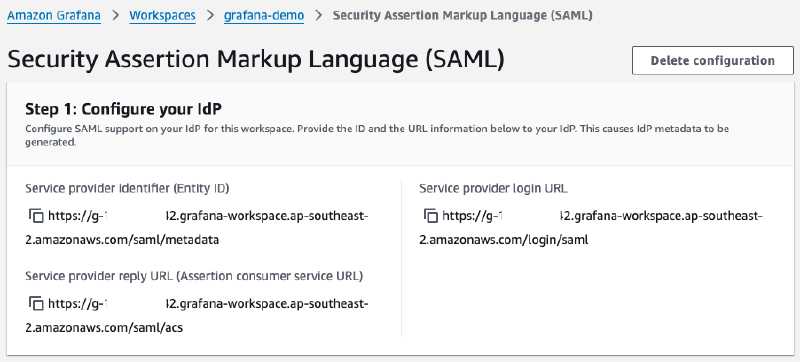
First, you need to copy the AWS Grafana identity service provider details to configure Entra ID.
- Log in to AWS console as administrator and navigate to Amazon Grafana.
- You will see a Grafana workspace
grafana-demo, select it. - In the Authentication tab, click SAML configuration.
- Copy the Service provider identity (Entity ID), Service provider reply URL(Assertion consumer service URL), and Service provider login URL.
Then, sign in to the Azure console as an administrator.
-
Navigate to Microsoft Entra ID.
-
Choose Enterprise Applications and create a new application.
-
Search for Amazon Managed Grafana, select and create it.
-
In the Amazon Managed Grafana application configuration, choose Users and groups.
-
Assign the application to the users and groups that you want.
For my demo, these Entra ID security groups are assigned to the enterprise application. The group names must match the the attribute role values configured in Step 1.

-
Choose Single sign-on and select SAML.
-
Specify your SAML settings in the Basic SAML Configuration section:
- For Identifier (Entity ID), paste in your
Service provider identifier URLfrom the Grafana workspace. - For Reply URL (Assertion Consumer Service URL), paste in your
Service provider replyfrom the Grafana workspace. - For Sign on URL, paste in
Service provider login URLfrom the Grafana workspace.
- For Identifier (Entity ID), paste in your
-
In the Attributes & Claims section, make sure that these attributes are mapped.
mailis set withuser.userprincipalname.displayNameis set withuser.displayname.Unique User Identifieris set withuser.userprincipalname.
-
Add a group claim in the Attributes & Claims section.
-
Click Edit and Add a group claim.
-
Select Groups assigned to the application to pass only Entra groups assigned to the enterprise application.
-
For Source attribute, select
Cloud-only group display names.
Selecting Cloud-only group display names will pass the Entra group names instead of group IDs as claim values.
-
Under Advanced Options, check the option Customize the name of the group claim and the required name to
groups.
The custom name must match the assertion attribute values in Step 1 (AWS Grafana workspace SAML configuration).
-
Save the settings.
-
Back in the Single sign-on page, make sure there is an additional SAML claim groups with the value user.groups.

In the SAML Certificates section, copy the SAML Metadata URL to update the Grafana workspace SAML configuration in the next step.

Step 3: Update Grafana SAML configuration
Switch back to the AWS console and navigate to Amazon Grafana. Select the Grafana workspace grafana-demo.
In the Authentication tab, click SAML configuration to update the SAML configuration for the Grafana workspace to finish setting up Entra ID as an identity provider:
-
Under Import the metadata section, you can either import the IdP federation metadata by specifying a URL, or upload or copy/paste the metadata XML file.
-
Make sure the URL method is selected.
-
Replace the dummy URL by pasting the Entra ID application Federation Metadata URL that was copied in the previous step.
-
In the Map assertion attributes section, verify the following:
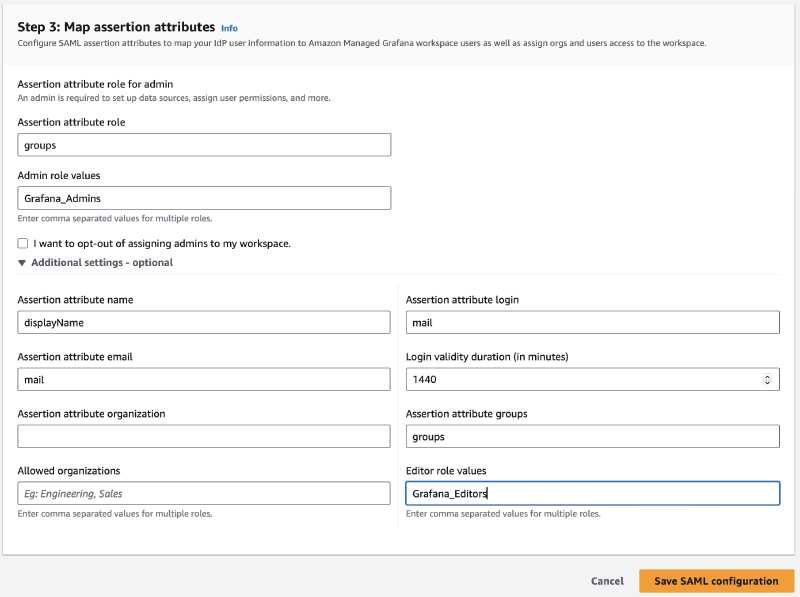
- The Assertion attribute role is set to the attribute name
groups. - The Admin role values corresponds to the Entra ID admin group
Grafana_Admins. - The option I want to opt-out of assigning admins to my workspace is not selected.
- Expand Additional settings - optional, check the Assertion attribute groups and the Editor role values have the values
groupsandGrafana_Editorsrespectively.
These values are populated using Terraform in Step 1.
- The Assertion attribute role is set to the attribute name
-
Choose Save SAML configuration.
You should now be able to login to Grafana using SAML. If you click the the Grafana workspace URL on the workspace page, you will get the Grafana welcome page.

The Grafana SAML configuration is now complete. Clicking on Sign in with SAML will redirect you to Entra ID for login authentication.
Step 4: Creating a basic Grafana dashboard
For demo purpose, I created a simple Grafana dashboard to visualise the EC2 metrics from CloudWatch.
The Terraform code to deploy the Grafana dashboard and configuration is available in my GitHub repository.
To create the Grafana dashboard, run the following commands.
git clone https://github.com/wtkhoo/aws-grafana-dashboard.git
cd aws-grafana-dashboard
terraform init
terraform apply -auto-approve
Note that this Terraform stack references the Terraform stack in Step 1. If you hit the following error:
│ Error: error reading datasource with ID`1:be713sh70ijnkb`: [GET /datasources/uid/{uid}][401] getDataSourceByUidUnauthorized {"message":"Expired API key"}
│
│   with grafana_data_source.cloudwatch,
│   on main.tf line 1, in resource "grafana_data_source" "cloudwatch":
│    1: resource "grafana_data_source" "cloudwatch" {
Switch to the aws-grafana-saml directory, run the following command to re-create the expired Grafana service account token:
terraform apply -replace aws_grafana_workspace_service_account_token.demo_admin
Let’s walk through the Terraform code.
Create a simple dashboard to view CloudWatch metrics
I utilise the Terraform Grafana provider to create the resources in Grafana.
resource "grafana_dashboard" "ec2" {
  config_json = file("./aws-ec2.json")
  folder      = grafana_folder.demo.id
  overwrite   = true
}
This code creates a simple Grafana dashboard using the AWS EC2 dashboard configuration from Monitoring Artist project and put the dashboard inside a folder.
Define a Grafana data source
This creates the CloudWatch Grafana data source.
resource "grafana_data_source" "cloudwatch" {
  type = "cloudwatch"
  name = "cloudwatch"
  json_data_encoded = jsonencode({
    default_region = "ap-southeast-2"
  })
}
Create Grafana teams and map external group sync
A few Grafana teams are created - Grafana_Admins, Grafana_Editors, Grafana_Viewers - and mapped to the Entra group names for external group sync.
resource "grafana_team" "admin" {
  name  = "Grafana_Admins"
  team_sync {
    groups = ["Grafana_Admins"]
  }
}

resource "grafana_team" "editor" {
  name  = "Grafana_Editors"
  team_sync {
    groups = ["Grafana_Editors"]
  }
}

resource "grafana_team" "viewer" {
  name  = "Grafana_Viewers"
  team_sync {
    groups = ["Grafana_Viewers"]
  }
}
The Entra group names - Grafana_Admins, Grafana_Editors, Grafana_Viewers - are passed in to Grafana as SAML claim (groups) values in the SAML assertion.
Set up Grafana folder permissions
Grafana folders help you organise and group dashboards, which is useful for managing dashboard permissions for multiple teams.
resource "grafana_folder" "demo" {
  title = "demo"
}

resource "grafana_folder_permission" "demo" {
  folder_uid = grafana_folder.demo.uid
  permissions {
    team_id    = grafana_team.admin.id
    permission = "Admin"
  }
  permissions {
    team_id    = grafana_team.editor.id
    permission = "Edit"
  }
  permissions {
    team_id    = grafana_team.viewer.id
    permission = "View"
  }
}
Here a demo folder is created and assigned the Grafana role permissions (Admin, Edit, View) accordingly.
Step 5: Log in to Grafana
Now that the Grafana dashboard, folder permissions and team sync configuration have been sorted out, we are ready to log in to Grafana.
Click on Sign in with SAML on the Grafana welcome page and you will be redirected to Microsoft authentication portal, and sign in with an Admin user and let’s check the Grafana configuration.
-
On the left navigation pane, go to Administration -> Users and access -> Users.

In my demo, a few users have been created with varying roles through the successful SAML sign-ins.
-
Next, navigate to Administration -> Users and access -> Teams.

The Grafana teams Grafana_Admins, Grafana_Editors, and Grafana_Viewers were created.
-
Click on the pencil icon (Edit team) on the far right for Grafana_Viewers.

Two Entra users were automatically assigned as members of Grafana_Viewers team. Select the tab External group sync.

Here the external Entra group Grafana_Viewers, where the two Entra users are the members, is mapped to the Grafana team Grafana_Viewers.

-
Click on Dashboards on the left navigation pane. You will see the folder
demo, click on the folder name. Select Folder actions -> Manage permissions.
The Grafana folder have different role permissions assigned for each Grafana team.
-
There is a dashboard in the
demofolder. Click on AWS EC2 to view dashboard.
That’s it - how to use SAML group attribute and Grafana team sync to provide SAML-based group access control in AWS Grafana.
Conclusion
In this blog post, I have shown you how to deploy Amazon Managed Grafana and Grafana dashboard using Terraform, integrating it with Microsoft Entra ID using SAML, and configuring Grafana teams with external groups, which allows automatic sync of the assigned Entra groups when the Entra users logged into Grafana through SAML successfully.