Demonstrating ABAC with AWS IAM Identity Center
August 4, 2024 AWS IAM
In this blog post, we will walk through how to set up single sign-on (SSO) between AWS IAM Identity Center and Microsoft Entra ID, and how attribute-based access control (ABAC) can be leveraged to manage permissions based on user attributes (tags).
I will demonstrate how we federate AWS IAM Identity Center with Microsoft Entra ID and utilise user attribute value to control access to AWS EC2 instances.
Pre-requisites
The scenario outlined in the demonstration assumes that you already have the following pre-requisites:
- Microsoft Entra tenant (free edition will work however group synchronisation is not available)
- One of the following roles: Application Administrator, Cloud Application Administrator, or Application Owner.
- Two Entra ID users with user attribute Department populated
- An AWS IAM Identity Center-enabled account
- AWS IAM user with AWS managed Administrator policy
Set up AWS IAM Identity Center integration with Microsoft Entra ID SSO
Before we can proceed with the demo, we need to establish SSO federation between AWS IAM Identity Center SSO and Microsoft Entra ID. The setup requires a series of manual steps as there is no AWS API available to automate this configuration. It involves manually exchanging metadata files between AWS and Azure.
I will provide a brief tutorial of the steps here. For an in-depth guide and detailed instructions, you can refer to the AWS documentation Configure SAML and SCIM with Microsoft Entra ID and IAM Identity Center .
Step 1: Integrate AWS IAM Identity Center with Entra ID Enterprise Applications
-
Log into the Azure Portal, search for “Entra ID” and open the Microsoft Entra ID service.
-
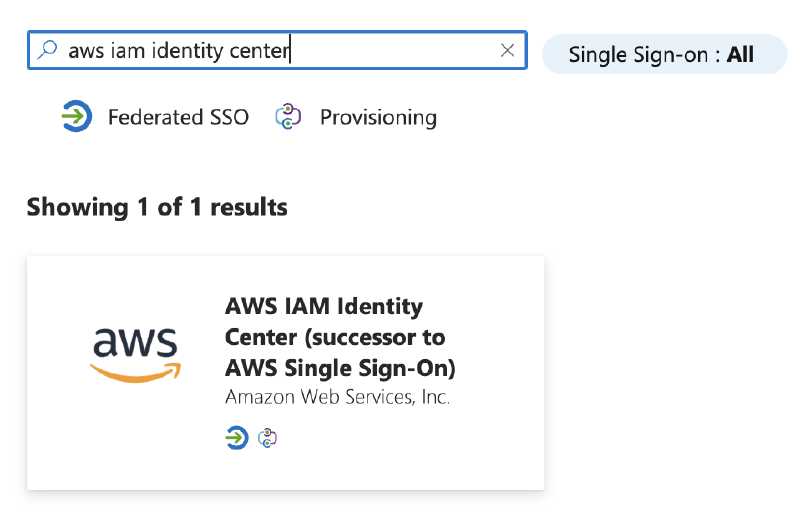
In the left-hand menu, select Enterprise Applications and click on + New Application. Search for “AWS IAM Identity Center” and choose AWS IAM Identity Center (successor to AWS Single Sign-On).
- Provide a name for your application and click the Create button.
Step 2: Configure IAM Identity Center Identity Provider
-
Keep the Azure Portal open and switch to AWS Console. Log into the AWS console and navigate to IAM Identity Center.
-
Go to Settings > Identity source. Click on Actions and choose to Change identity source.

-
Select External Identity Provider and click Next.
-
In the dialog box, download the metadata file and note the AWS access portal sign-in URL. You will need this in the next step.

Step 3: Set Up Single Sign-On in Entra ID
- Switch back to the Azure Portal and select Set up single sign-on > Get started.

-
Choose SAML as the single sign-on method.
-
Click the button Upload metadata file to upload the metadata file downloaded from AWS and then click Add.

Once the metadata is uploaded, fill in the Sign On URL (Optional) with the URL (portal sign-in URL) you copied from AWS and save the settings.
- Download the Federation Metadata XML in the SAML Certificates section. You will need this file for AWS configuration.

- In the AWS IAM Identity Center, upload the Azure Federation Metadata XML file in the Identity provider metadata section.

Confirm successful upload of the metadata file and click Next.

Confirm that you want to change your identity source by entering ACCEPT in the field and click the Change identity source button.
Step 4: Enable Automatic Provisioning in AWS
- You want to enable automatic users (and groups) provisioning from Entra ID. To do this, enable the automatic provisioning in AWS IAM Identity Center settings page.

If you don’t see the blue Automatic provisioning information box, click Actions drop-down and choose Manage provisioning.
- The SCIM endpoint and access token information will be displayed. Copy the SCIM endpoint and access token values.

- Return to the Azure Portal, in the AWS IAM Identity Center Enterprise Application you created, select Assign users and groups to add some users.

Note that groups synchronisation is not available on the free version of Entra ID therefore only individual users can be selected. Select the required users and click on the Assign button.
- In the Provisioning section, set the mode to automatic and populate the Admin Credentials section with the SCIM endpoint and access token values from AWS.

Click Test Connection to confirm the integration is working.
- If the test connection is successful, you can start the provisioning in Entra ID. Click the Start provisioning button.

It takes some time for the synchronisation to run and complete. For troubleshooting, view the provisioning logs for any error. After a few minutes, check that the Entra ID users appear in AWS Identity Center through SCIM provisioning.

Step 5: Modify Entra ID to Pass Additional SAML Claims
-
Back to the Azure Portal, open the AWS IAM Identity Center Enterprise Application. Click Manage > Single sign-on.
-
Click on the Edit icon in the Attributes and Claims section, and then add a new claim.

- Populate the Manage Claim details as shown below. Click the Save icon to save changes and exit.

This configuration ensures that the Entra ID user attribute user.department is passed to AWS as a SAML claim. The SAML claim will be mapped as AWS SSO session tag which can then be utilised in IAM policies.
Demonstrating Attribute-based access control with custom permission set
The assigned Entra ID users can now login to AWS through the AWS Identity Center access portal and the user attribute department will be mapped through in the AWS session tags. Next, we will create a custom permission set to control access to AWS EC2 instances based on that Entra ID user attribute.
Here is the overview of the demo environment architecture:
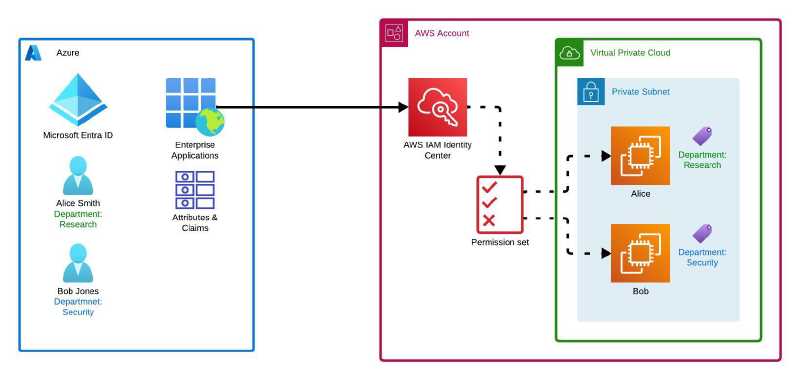
In our fictitious demo company, Alice Smith is a developer in the Research Department and Bob Jones is a security engineer in the Security Department. Each department owns an AWS EC2 instance. The Research department owns EC2 instance Alice and the Security department owns EC2 instance Bob. The EC2 instances are visible to both departments but can only be stopped and started by users within that department.
We will deploy the required AWS resources for the demo using Terraform (yay!). The Terraform code is available in my Github repository.
The Terraform code creates the following AWS resources:
- a basic VPC with private subnet, route table and association
- a couple of EC2 instances with the corresponding Department tag
- a custom permission set with the following IAM permissions:
{
    "Version": "2012-10-17"
    "Statement": [
        {
            "Sid": "ReadOnlyAccess",
            "Effect": "Allow",
            "Resource": "*",
            "Action": [
                "ec2:DescribeInstances",
                "ec2:DescribeImages",
                "ec2:DescribeVolumes",
                "ec2:DescribeTags",
                "ec2:DescribeSnapshots"
            ]
        },
        {
            "Sid": "ConditionalStartStop",
            "Effect": "Allow",
            "Resource": "*",
            "Action": [
                "ec2:StartInstances",
                "ec2:StopInstances"
            ],
            "Condition": {
                "StringEquals": {
                    "aws:ResourceTag/Department": "${aws:PrincipalTag/Department}"
                }
            }
        }
    ],
}
There is a condition statement in the IAM policy that controls who is allowed to perform the operations based on the principal and resource tags.
"Condition": {
    "StringEquals": {
        "aws:ResourceTag/Department": "${aws:PrincipalTag/Department}"
    }
}
The aws:PrincipalTag/Department is the user attribute of the IAM principal (Entra ID users) and the aws:ResourceTag/Department is the resource tag name on the EC2 instances. The EC2 instance start and stop operations are only allowed if the principal tag matches the resource tag.
The Terraform code enables the AWS IAM Identity Center attribute-based access control and maps the user attribute value coming from Entra ID (user.department) to an attribute that IAM Identity Center passes as a session tag (Department).
resource "aws_ssoadmin_instance_access_control_attributes" "abac_demo" {
  instance_arn = tolist(data.aws_ssoadmin_instances.this.arns)[0]

  attribute {
    key = "Department"
    value {
      source = ["$${path:enterprise.department}"]
    }
  }
}
It also assigns a list of test users with the custom permission set “ABACdemo” to a designated AWS account.
Step 1: Deploy AWS Resources for testing
-
Clone the code repository to your local machine and initialise the Terraform deployment.
git clone https://github.com/wtkhoo/abac-sso-demo.git cd abac-sso-demo terraform init -
Create a
terraform.tfvarsfile and specify the values.# AWS Account ID to map permission set account_id = "123456780123" # List of User Principal Names for permission set and AWS account association user_list = ["[email protected]", "[email protected]"] -
To preview what will be created, run the terraform plan command.
terraform plan -
Run terraform apply command to provision the resources.
terraform apply -auto-approve
When the deployment completed successfully, you can confirm that the Entra ID test users and the permission set ABACdemo are assigned to the AWS account. Navigate to IAM Identity Center > Multi-account permissions > AWS accounts and click on the corresponding account name.

Next step, we will test the attribute-based access control.
Step 2: Validate the Access Control
For this step, log in to your AWS Identity Center access portal using one of the Entra ID users. In my demo, I decided to use the Research Department user Alice Smith.
- Sign in to the AWS Identity Center access portal with Alice Smith user credentials.

Simply click on the role ABACdemo to log on to the AWS account. You will see some API and access denied errors in the AWS console because of the limited IAM permissions given in the role permission set.
- Navigate to EC2 service dashboard. Verify that Alice Smith can see all EC2 instances.

All EC2 instances are visible to Alice Smith. The status check and alarm status errors can be ignored.
- Select the EC2 instance abac-demo-Alice and click Instance state > Stop instance. Click Stop to confirm.

The EC2 instance shuts down successfully as expected. Let’s try to start the EC2 instance back up.

And success!
- Now select and try to stop the other EC2 instance abac-demo-Bob.

This time it failed with an error.
This demo validates that Alice Smith can stop and start the EC2 instance (abac-demo-Alice) owned by Research Department but unable to stop or start the EC2 instance (abac-demo-Bob) owned by the Security Department.
Summary
I have covered the steps to set up AWS IAM Identity Center SSO integration with Microsoft Entra ID, configure Entra ID to pass an user attribute as SAML claim to AWS, and then use the SAML claim to control access to EC2 instances, along with a demonstration on how the Attribute-based Access Control (ABAC) can be used to manage AWS resources based on user attributes.
References
- Configure SAML and SCIM with Microsoft Entra ID and IAM Identity Center - https://docs.aws.amazon.com/singlesignon/latest/userguide/idp-microsoft-entra.html
- Tutorial: Microsoft Entra SSO integration with AWS IAM Identity Center - https://learn.microsoft.com/en-us/entra/identity/saas-apps/aws-single-sign-on-tutorial
- Checklist: Configuring ABAC in AWS using IAM Identity Center - https://docs.aws.amazon.com/singlesignon/latest/userguide/abac-checklist.html